
I hope this page gives some people insight, if they decide to try chroming liner on their own. I'm just a rookie but, I've done quite a bit of reading on the subject, and since I work in the aircraft repair industry and we do some types of plating at work, I could set it up there and be legal in the eyes of the EPA. I'm following the book, along with other info from the modeling guys. Here's a site that gives out some great info on the subject of chroming for modelers, Chroming , check it out, very informative.

I'm not going through all the precautions about saftey, that just plain common sense, read the MSDS sheets for the chemicals and follow some basic guidelines like, gloves and a respirator and you should be in good shape.
I bought a chrome plating kit form Caswell Inc., #CHRPK1G, that contained the chrome crystals, flat anode material, the tank heater, some other items, and a very informative book " The Complete Plating Manual ". Other chemicals were bought from local sources and round anode material from Macmaster Carr, basicly round lead or solder.
First photo is the AC power supply that I use, it's limited to 11 amps which is about max for doing .40 size liners and under, we're looking for about 2-4 amps per square inch. I picked up this unit on ebay for a very good price plus, it is filtered power, very clean which is what is needed for plating.
Photo to the right is the way I've "organized " my setup. I've heard of people using 10 gallon tanks or other, outragous sizes, let's face it, we're chroming small stuff here, not car bumpers! The main tank is a 2000 ml glass beaker, suspeneded by stainless wire, in a 1 gallon paint bucket, dropped into a 2 1/2 gallon paint bucket filled with expandable foam, system is simular to a double boiler with, insulation.
The photo shows some of the chemical, in the background, needed for cleaning and preperation of items to be chromed, all in their own containers, a 1 gallon paint bucket with, a 400 ml low griffen beaker inside for saftey and also, it was easier to seal them up this way for storage, when not in use. Except, for the Stainless container, on the right, this is used for cleaning the item, under current, in an alkaline solution, as mentioned in the article.
The photo on the right gives you a better idea of the setup, note the aquarium heater suspended in the water instead of in the chromic acid solution. I wired up a kind of a hanger basket, to suspend the 2000 ml beaker in the water and keep it centered up in the pail.
Below is a photo of the plating fixture for doing liners, made from cast acrylic palstic, one of the few materials not affected by the plating solution.


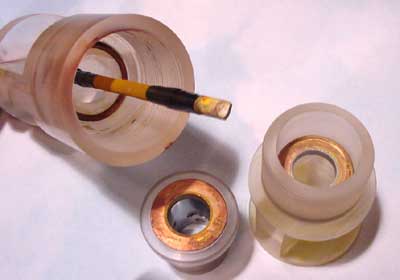
I have to give credit to John McCullum for the design of the fixture and passing it on. First piece on the left locates the anode and copper wire diode to complete the connection. Next is the top brass thief, the liner, brass shim stock, lower brass thief, liner holder, and the bottom.
The thiefs are designed to keep " dingleberries " from forming on the liner and gives a cleaner cut to the plating on both ends of the liner. The brass shim stock is wrapped around the liner to cause the chrome to shoot through the ports and plate the brass along with the port windows for a cleaner plating job. A closer view on the right shows the coil wrap of the copper wire/diode and the thiefs in their proper location. The liner holder and thiefs are custom made for different liners.There is an open hole through the fixture on top and bottom for free flow of the chromic solution, thats why you see those, kind of see legs, on the top and bottom